Many people fail to realize that the depth of screen printing is often achieved with halftones. While learning how to halftone an image in Photoshop for screen printing might seem demanding, this skill can help transform a simple image into a screen-printing masterpiece.
In this article, we’ll provide a detailed step-by-step guide and tips on how to convert an image into a halftone. We’ll also offer you a deep understanding of halftones and explain their significance in screen printing.
How to Halftone an Image in Photoshop for Screen Printing Step-By-Step
Halftoning is one of the best screen printing practices, and it’s more than just a technical necessity. Although there are different methods and design tools on how to create a halftone for screen printing, we prefer to use Photoshop. This software has a built-in tool for creating halftones that offer plenty of options.
1. Preparing the Image
First, we need to select the right image. The quality of the original image significantly impacts the final result. Keep in mind that once the design is converted into halftones, there is no way to make additional changes to the image. This is why ensuring we have the right image is always a priority.
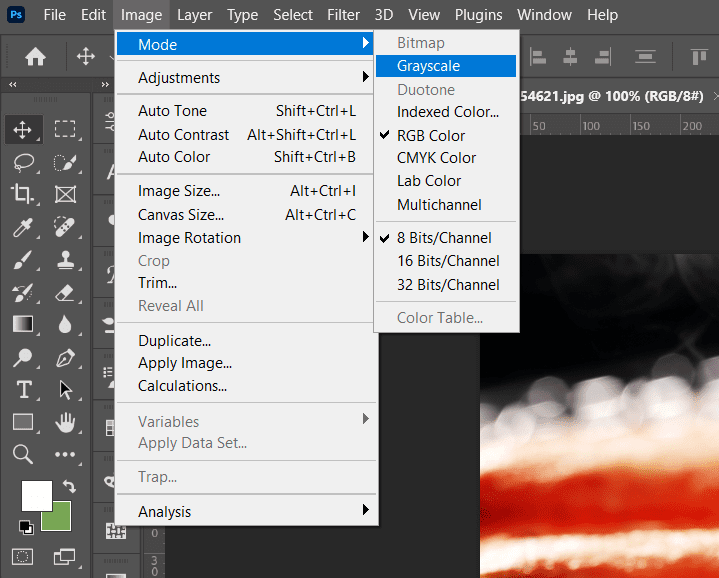
2. Converting to Grayscale
This step simplifies the image and prepares it for halftoning. To do this, we go to Image > Mode > Grayscale. Photoshop will likely ask if you want to discard all color information. To finalize the decision, we click “OK“. This will cause all colors from the image to disappear, and the only color showing information will be black.
Before proceeding, we like to check our grayscale image values to ensure that our black and white areas match. If there is a mismatch, we can use Control+M to make the necessary adjustments.
3. Applying the Halftone Filter
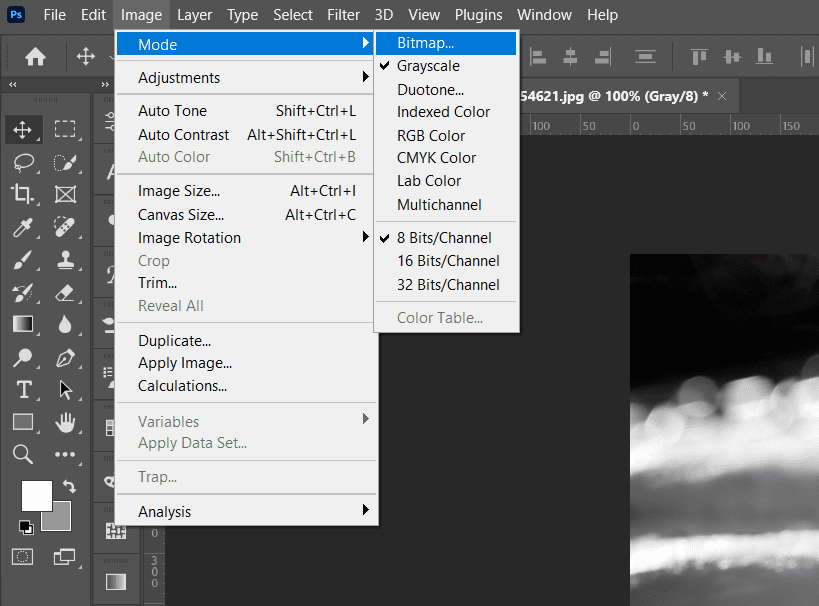
Now comes the crucial part – applying the halftone filter. We navigate to:
Image > Mode > BitMap
A pop window appears that asks if you want to flatten the image layer, and we click “OK“ to confirm our decision. The BitMap popup also requires us to choose a method. We choose the Halftone Screen as a method and click “OK”.
4. Fine-Tuning the Halftone Effect
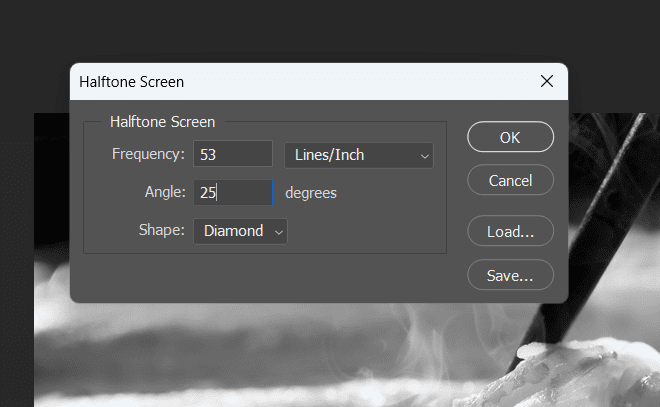
Some common terms used when discussing halftone settings for screen printing Photoshop include LPI, halftone screen, and halftone frequency. These all refer to the same thing. LPI stands for lines per inch and is directly linked to the size of the halftone dots.
A lower LIP causes bigger dots, while a higher LIP results in smaller halftone dots.
Many manufacturers believe that the optimal halftone frequency for screen printing is between 45 to 55 LPI. This is because this LPI range is suitable for most images.
However, the LPI will mainly depend on the result you are looking to achieve. For instance, photorealistic images usually need a higher LPI of 65.
The output angle is another key factor in halftoning. We usually set the angle at 25 degrees and choose either a round or elliptical dot shape, depending on the project.
5. Preparing for Screen Printing
Finally, we need to prepare our halftone image for screen printing. This involves considering the screen mesh count and ensuring that our halftone dots are compatible with it. Halftones usually go best with a higher mesh count.
For our halftone screen printing practices, we use a mesh count between 230 and 280. We also need to consider the ink and substrate we’ll be using, as these can affect the final print.
A unique consideration that plays a significant role in the success of halftone design is the type of emulsion used in the screen print. Using high-quality emulsion can give the final halftone print a clearer, more detailed appearance. The emulsion must be applied accordingly, as inconsistencies may easily lead to distorted or blue halftones.
Understanding Halftones
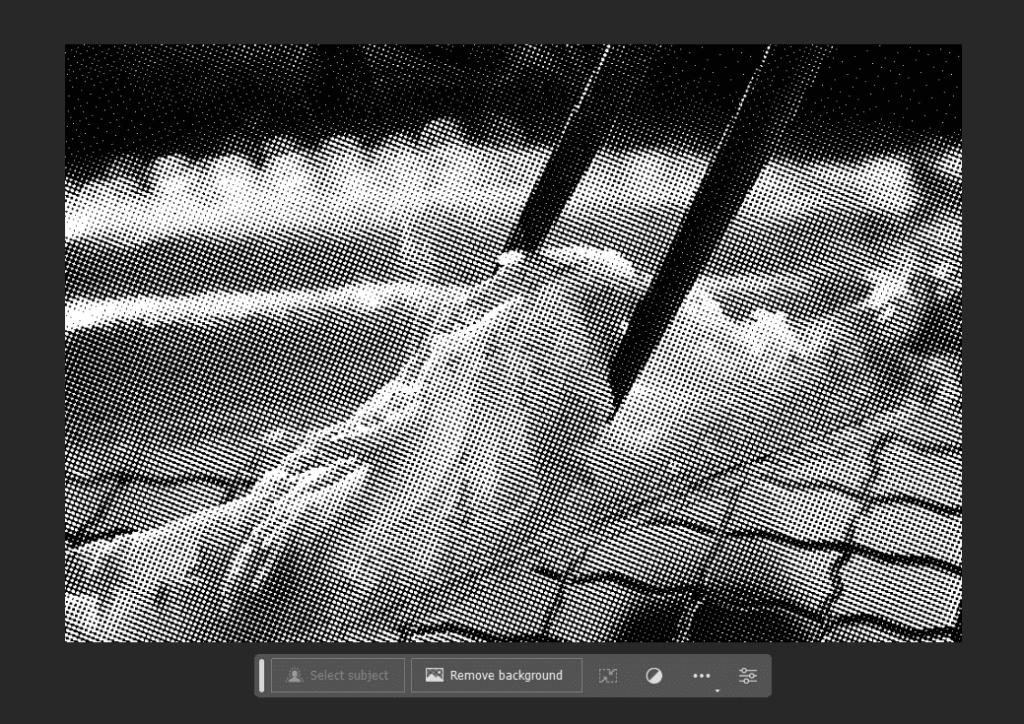
Explaining how to halftone an image for screen printing would be impossible when unfamiliar with the basics. The easiest way to explain what are halftones is to describe them as intricate dot patterns that help add depth. Better said, halftones create the illusion of depth within a design.
In screen printing, we like to say that halftones help us bring an image to life. This saying comes from the fact that halftones can make a single-color design appear as an illustration.
Why is halftoning essential for screen printing?
Halftoning is a creative tool that adds depth and texture to screen-printed images. By converting images into halftones, we can reproduce photographs, gradients, and complex illustrations with screen printing, which would otherwise be impossible.
So what does this all mean? Essentially, halftones allow us to use just a single color and create the illusion of using multiple shades.
Conclusion
Learning how to halftone an image in Photoshop for screen printing is an invaluable skill for any screen printer. It allows us to transform ordinary images into print-ready artworks, ready to be transferred onto a myriad of surfaces.
Creating a halftone for screen printing might initially seem complex, but with practice, it becomes a natural part of our creative workflow. Remember, every halftone pattern we create is a step towards mastering the art of screen printing.

Robert Fisher is the founder and CEO of Thrive Screen Printing and brings extensive experience in the screen printing and fulfillment industry.

