
Whether you’re looking to add photorealistic details to your screen prints or wondering how those smooth gradients appear on your favorite band tees, you’ve come to the right place. We understand that mastering halftone techniques can seem daunting at first, but we’re here to demystify this powerful printing method that transforms ordinary designs into extraordinary visual experiences.
Halftones in screen printing are mathematical dot patterns that create an optical illusion of continuous tones through varying dot sizes and spacing. When viewed from a normal distance, these tiny dots blend together in the human eye to produce smooth gradients and photorealistic imagery, despite being composed of discrete printed elements.
TL;DR Summary: We’ll explore halftone fundamentals including dot types and optimal 22.5° printing angles, the complete printing process from artwork preparation to final output, essential quality factors like mesh count formulas (divide by 4-5 for ideal LPI) and 30% industry-standard dot gain compensation, step-by-step artwork creation including 300 DPI requirements and RIP software selection, common troubleshooting solutions for moiré patterns and detail loss, and how Thrive Screen Printing’s expertise can elevate your halftone projects with state-of-the-art equipment and decades of experience.
Quick Universal Tip: Always verify your artwork meets the 300 DPI minimum resolution before beginning any halftone project—this single factor determines the maximum achievable detail in your final print, following the formula: 300 DPI ÷ 2.5 = 120 LPI maximum detail.
As we dive deeper into the technical aspects and practical applications of halftone printing, you’ll discover how this century-old technique continues to revolutionize modern screen printing, offering cost-effective solutions for creating stunning multi-tonal designs with fewer screens and superior durability compared to digital alternatives.
What Are Halftones in Screen Printing and Why Are They Important?
Halftones are mathematical dot patterns that represent grayscale values through varying dot sizes on a grid system. This reprographic technique simulates continuous-tone imagery by creating an optical illusion—tiny halftone dots appear as smooth gradations when viewed from normal distance due to the human eye’s limited optical resolution.
Screen printing shops utilize halftones to create detailed photorealistic designs that capture nuanced shading impossible with solid colors. The technique allows for cost-effective production by using fewer inks while maintaining high quality results. According to industry projections, the screen printing market will grow from USD 4.873 billion in 2025 to USD 9.527 billion in 2030, with halftone technology contributing significantly to this 14.35% CAGR expansion.
This section explores how halftone mechanics work, their advantages over full-color alternatives, and the technical differences from continuous tone imagery.
How Do Halftones Create Shading and Gradients in Prints?
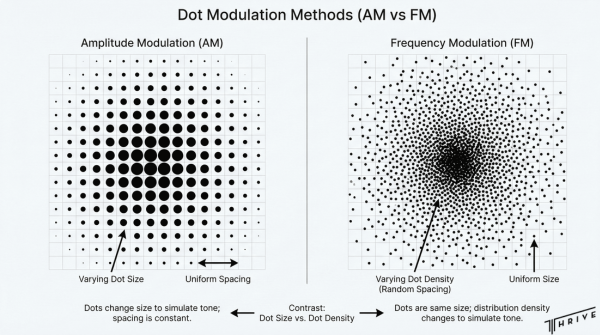
Halftones create shading through two primary modulation methods that control dot characteristics. AM (Amplitude Modulated) halftones use grids where dot size correlates directly to color intensity while maintaining fixed spacing between dots. FM (Frequency Modulated) halftones produce laser-generated points smaller than traditional analog raster dots, offering finer detail reproduction.
Square dots blend with four neighboring dots simultaneously, creating steep tone transitions ideal for sharp contrast areas. The varying dot sizes and spacing simulate continuous tones, producing the illusion of smooth color gradations that capture subtle shading nuances impossible with solid color applications.
What Is the Difference Between Halftones and Continuous Tone Images?
Continuous tone images contain smooth gradations without visible dot structures, while halftones use discrete dots to simulate these gradations through optical illusion. Halftones convert continuous imagery into printable dot patterns that the human eye perceives as continuous from standard viewing distances.
Resolution matching between source files and output devices ensures optimal halftone quality. Higher resolution creates a more convincing optical illusion, making printed images appear as complete pictures rather than collections of individual dots when viewed at normal distances.
Why Are Halftones Used Instead of Full-Color Images in Screen Printing?
Halftone printing allows high-quality image creation using less ink compared to solid color printing, reducing material costs and simplifying setup procedures. Screen printers with limited press space can reproduce full-color images by blending different shades of the same color rather than using additional color stations.
The technique produces more vibrant finishes than digital printing with superior durability on textile substrates. Cost savings extend beyond materials—halftones require fewer inks, reduced setup time, and streamlined production workflows while maintaining professional image quality that meets client expectations for photorealistic results.
How Does the Halftone Printing Process Work?
The halftone printing process creates photorealistic images by converting continuous tones into printable dot patterns through systematic color separation and digital processing. The workflow begins with examining the source image, assessing textile compatibility, selecting colors, and splitting the design into separate layers for each screen color.
RIP (Raster Image Processing) software automates halftone creation and handles all conversions automatically when printing films. The system adjusts design patterns according to material properties to account for dot gain—the natural enlargement of dots during printing that affects final appearance.
Modern halftone processing delivers significant advantages over manual methods. Digital automation reduces setup time while ensuring consistent quality across production runs. The software adapts each design to specific substrate characteristics, preventing the oversaturation issues that plagued earlier halftone techniques.
What Types of Artwork Work Best with Halftones?
The best artwork for halftones includes photorealistic images requiring detailed gradients and shading effects. Entertainment industry demands drive many photorealistic printing applications, particularly for band merchandise and promotional materials requiring lifelike reproduction.
Halftones excel at creating realistic-looking effects, subtle shades, and images with complex shadows across multiple surfaces including paper, fabric, and plastic. The technique captures nuanced tonal variations impossible with solid color printing alone.
Quality Requirements:
- Minimum 300 DPI resolution for professional results
- High contrast source images with clear detail
- Smooth tonal gradations rather than hard edges
- Adequate file size to maintain detail at final print dimensions
How Is a Continuous Image Converted into Halftones?
RIP software converts continuous images into halftone patterns through automated algorithms that dramatically speed up the traditional manual process. Popular software options include AccuRIP, Wasatch, Printfab, and FilmMaker, each offering specialized features for screen printing applications.
Sep Studio NXT provides comprehensive editing tools including color isolation, erase functions, and adjustable color density with saturation controls. AccuRIP Emerald features the Reprocess Feature, allowing halftone setting adjustments per job without changing default parameters.
Professional calculation: 300 DPI in source photo ÷ 2.5 = 120 LPI maximum achievable detail. This formula helps determine optimal line screen frequency based on original image resolution, ensuring the final print maintains maximum possible detail without exceeding technical limitations.
What Are the Most Common Halftone Patterns?
Round dot shapes represent the most popular halftone pattern due to their smooth tonal transitions and reliable printing characteristics. Alternative patterns include elliptical and square dots, each offering distinct visual effects and technical advantages.
Printers select dot shape preferences within RIP software based on specific project requirements. Square dots create steeper tone value transitions by blending with four neighboring dots simultaneously, while elliptical dots provide compromise characteristics between round and square patterns.
Standard specifications include:
- 51 LPI commonly used for general applications
- 45 LPI with 230 mesh creates optimal printing combinations
- Round dots for smoothest gradations
- Software-selectable patterns for design flexibility
The upcoming sections will explore dot angles and their critical role in preventing moiré patterns, plus quality factors that determine successful halftone reproduction.
What Halftone Dot Types and Angles Are Used in Screen Printing?
Halftone dot types and angles in screen printing require specific configurations to avoid mesh interference and achieve optimal print quality. The angle selection directly impacts whether dots can properly transfer through the screen mesh without alignment issues.
Dots positioned at right angles (0°, 90°, 180°, 270°) align with mesh threads and cannot print effectively. The 45° angle, while optimal for human viewing, hits mesh knuckles diagonally and loses significant detail. Screen printers achieve best results using a 22.5° angle, which bisects the mesh so dots miss both threads and knuckles by falling between them.
The following sections examine how dot shape affects tonal transitions and why proper angle selection prevents moiré patterns in multi-color prints.
How Does Dot Shape Affect the Final Print?
Dot shape affects the final print by controlling how tonal transitions appear in the finished image. Square dots blend with four neighboring dots simultaneously, creating steep tone value transitions with more abrupt changes between light and dark areas. Round dots provide smoother tonal transitions that better mimic continuous-tone photography. Elliptical dots offer a compromise between round and square characteristics, providing moderate transition smoothness.
RIP software preferences allow printers to select their preferred dot shape based on the specific image requirements and desired aesthetic outcome.
Why Is Halftone Angle Important for Preventing Moiré Patterns?
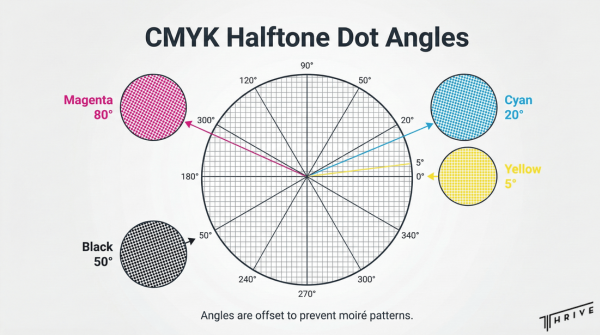
Halftone angle is important for preventing moiré patterns because proper angle separation eliminates visual interference between overlapping color screens. Keep halftone angles 30° apart for contrasting colors to avoid unwanted pattern conflicts.
Two common angle sets work effectively for four-color printing:
- Standard set: Y 5°, C 20°, K 50°, M 80°
- Alternative set: Y 7.5°, C 22.5°, K 52.5°, M 82.5°
Screen printers and flexographers successfully prevent moiré by rotating angles 4-8° between colors. Use the highest mesh-to-dot ratio possible, with 4:1 or 3.5:1 serving as common guides. Higher ratios reduce moiré chances significantly.
This technical foundation for dot configuration leads naturally to understanding the quality factors that affect halftone reproduction consistency.
What Factors Affect Halftone Quality in Screen Printing?
Several factors affect halftone quality in screen printing. Dot gain occurs when the squeegee is pulled across the screen, causing pressure that makes dots appear larger than designed. The industry standard requires 30% dot gain compensation during preparation to prevent oversaturation and areas that should fade from appearing too dark. This phenomenon happens with all inks and all printers, making compensation essential for quality results. Better halftone quality reduces rejects and improves profit margins for screen printing operations.
The following sections explore how mesh specifications, ink selection, and printing technique directly impact your halftone reproduction quality.
How Do Mesh Count and Screen Tension Impact Halftone Detail?
Mesh count and screen tension impact halftone detail through specific mathematical relationships and physical constraints. The formula Mesh Count ÷ 5 = Ideal LPI provides the standard calculation, while Mesh Count ÷ 4 = Higher LPI offers an alternative for higher detail work that requires a dialed-in darkroom setup.
The general mesh range for halftones spans 230-280 mesh count, with 305+ mesh counts representing the top of the scale for highest detail work such as photorealism and fine halftones. Ideal tension range measures 20-25 N/cm for most applications, though most screens perform best at or above 25 N/cm.
Screen tension requirements include:
- Screens measured with a screen tension meter within 10% of each other
- Mesh tension kept within ±1-2 N/cm to prevent moiré patterns
- Tighter mesh requiring less squeegee pressure for optimal results
Choose a mesh with a high percentage open area and thin threads for superior performance. Finer thread examples include 305 threads per inch with 34-micron thread diameter, 380 threads per inch with 30 microns, and 420 threads per inch with 27 microns. All meshes should use plain weave construction.
What Role Does Ink Type Play in Halftone Reproduction?
Ink type plays a crucial role in halftone reproduction through viscosity and formulation characteristics. Many plastisols are not designed for halftones because they are too thick for proper dot formation. Higher viscosity inks cause halftone dots to spread and become larger during printing, compromising image quality.
Process plastisol inks are formulated with unique care for transparency, viscosity, and blendability specifically for halftone applications. Additives like viscosity modifiers are commonly used to optimize inks for halftone printing. Translucent inks are recommended for halftones, with darker ink than the shirt itself producing the best results.
Ink viscosity represents a compromise between preventing smudging in dark areas while permitting fine dots to transfer properly in light areas. This balance ensures consistent dot reproduction across the entire tonal range of your halftone image.
How Can Print Technique Influence Halftone Sharpness?
Print technique influences halftone sharpness through precise control of multiple variables during the printing process. The squeegee angle should be approximately 75°, while off-contact distance should be set to 1/8 inch to minimize the force needed for ink laydown. Use a sharp, somewhat firm squeegee designed specifically for halftone printing, which differs from squeegees used for normal print jobs.
Critical emulsion specifications:
- Maintain 8-12 microns emulsion-over-mesh (EOM) for optimal results
- EOM less than 8 microns causes improper dot formation and exaggerated thread eclipsing
- EOM greater than 12 microns prevents finer dots from transferring due to capillary action
Thin emulsion combined with well-tensioned screens can achieve a 4x ratio, while thicker emulsion or lower tension setups should use a 5x ratio. These ratios ensure proper ink transfer while maintaining dot integrity throughout the printing process.
This comprehensive approach to halftone quality factors prepares you for the next critical step: creating artwork optimized for halftone screen printing production.
What Are the Steps to Creating Artwork for Halftone Screen Printing?
Creating artwork for halftone screen printing involves several steps. First, ensure your artwork meets a 300 DPI minimum resolution for quality reproduction. Next, apply 30% dot gain compensation during preparation to prevent oversaturated images. Understanding DPI (Dots Per Inch), also called PPI (Pixels Per Inch), helps measure image resolution. The ability to keep detail directly related to LPI—you cannot achieve more detail on a shirt than what appears in an image at 2.5 times the LPI.
These preparation steps set the foundation for choosing software tools, determining halftone frequency, and managing color separation.
Which Software Tools Are Commonly Used for Halftone Preparation?
The software tools commonly used for halftone preparation include specialized RIP programs. ImagePrint R.E.D. connects to any printer for film transparencies, large format prints, stickers, and photos. ActionRIP RIP Software allows side-by-side comparison of original art versus changes. Sep Studio NXT offers full editing tools for color isolation and density adjustment. AccuRIP Emerald features a Reprocess Feature for per-job halftone adjustments. Popular options include:
- AccuRIP
- Wasatch
- Printfab
- FilmMaker
How Do You Determine the Right Halftone Frequency (LPI)?
The right halftone frequency (LPI) is determined using specific formulas. Formula #1: Dot Size × 4 or 4.5 = Mesh Count. Formula #2: Mesh Count ÷ 4 or 4.5 = LPI. For example, a 160 mesh count equals 32 LPI (÷5) or 40 LPI (÷4). Industry standards include 51 LPI as commonly used and 45 LPI working perfectly with 230 mesh. The minimum mesh for 35 LPI requires 157.5 or higher. Dots per inch should be set as twice the LPI value. The dot diameter should correspond to at least 2 threads plus 1 mesh opening of the halftone printing mesh.
What Should You Know About Color Separation with Halftones?
Color separation with halftones involves splitting images into separate layers for each screen color. Each color requires its own screen and halftone angle. CMYK angles commonly used are Y 5°, C 20°, K 50°, M 80°. An alternative angle set includes Y 7.5°, C 22.5°, K 52.5°, M 82.5°. Keep contrasting colors 30° apart to prevent moiré patterns.
This systematic approach to artwork creation ensures professional halftone results and prepares your designs for the technical challenges of screen printing production.
What Are Common Challenges and Solutions When Printing Halftones?
Common halftone printing challenges are dot gain on absorbent materials, thick plastisol inks, and quality control issues. Screen printers face dot gain when clothing materials absorb halftone dots, making them appear larger and darker than the initial design. Many plastisols prove too thick for halftone reproduction, requiring viscosity modification to achieve proper dot formation.
Material absorption creates the primary challenge in halftone printing. Cotton and cotton blends absorb ink differently than synthetic fabrics, causing unpredictable dot gain patterns. Printers must adjust their design and pattern according to the specific material to compensate for this absorption. The industry standard applies 30% dot gain compensation during preparation, but actual compensation varies by substrate type.
Ink viscosity modifications solve thick plastisol problems. Process plastisol inks formulated specifically for halftones offer superior transparency and controlled viscosity. Viscosity modifiers allow printers to adjust standard inks for halftone applications without compromising other printing properties.
Quality control initiatives prevent costly material waste. Reviewing film positives for quality before production prevents expensive revisions and material waste. Regular staff training on halftone standards increases production efficiency and profitability through reduced rejection rates.
The following sections address specific troubleshooting methods, moiré prevention techniques, and testing protocols that ensure consistent halftone quality.
How Do You Troubleshoot Loss of Detail or Blurry Halftones?
Troubleshooting blurry halftones requires systematic inspection under magnification and monitoring for specific printing defects. Inspect halftone dots under 10x or 20x magnification to check edge quality and dot formation consistency. Sharp, well-defined dot edges indicate proper screen preparation and printing technique.
Monitor for these common halftone defects:
- Excessive dot gain beyond 30% compensation
- Unpredictable color shifts between print runs
- Tonal compression in highlight and shadow areas
- Printing consistency issues across the substrate
Screen mesh selection directly impacts halftone detail reproduction. High mesh counts of 200+ threads provide suitable resolution for halftones and fine line details. Lower 110 mesh counts work better for thicker ink deposits and specialty finishes but sacrifice halftone detail. Mesh specifications show 110 screens equal 43 threads per centimeter while 200 mesh equals 78 threads per centimeter.
Establish a systematic quality checking system for consistent halftone production. Better pixel reproduction and higher resolution source files produce superior halftone designs. Source file resolution directly correlates with achievable halftone detail on the final print.
Regular magnified inspection catches defects early, preventing costly production runs with substandard halftone quality.
What Techniques Help Avoid Unwanted Moiré Effects?
Avoiding moiré effects requires precise mesh-to-dot ratios, proper emulsion thickness, and strategic angle rotation. Use the highest possible mesh-to-dot ratio, with 4:1 or 3.5:1 serving as common guides that vary continuously based on screen tension. Higher ratios reduce moiré probability significantly.
Maintain proper emulsion thickness between 8-12 microns for optimal halftone reproduction. Emulsion below 8 microns causes improper dot formation and exaggerated thread eclipsing. Thickness above 12 microns prevents finer dots from transferring through capillary action.
Screen tension consistency prevents moiré patterns across multi-color prints. Keep all screens within ±1-2 N/cm tension variance to maintain consistent dot reproduction. Tension variations create uneven halftone registration that produces visible moiré effects.
Mesh selection focuses on finer thread diameters with high open area percentages. Examples include 305 threads per inch with 34-micron thread diameter, 380 threads per inch with 30-micron threads, or 420 threads per inch with 27-micron threads.
Angle rotation strategy eliminates mesh alignment problems:
- Rotate halftone angles by 4-8° between colors
- Avoid 0°, 90°, 180°, and 270° angles that align directly with mesh threads
- Use 22.5° as the primary angle that bisects mesh threads optimally
These techniques collectively prevent moiré formation while maintaining halftone detail and color accuracy.
How Can You Test and Refine Halftone Prints Before Full Production?
Testing halftone prints through digital proofing and systematic print trials prevents production failures and client rejections. Digital proofs with simulated halftones help clients understand the final product appearance, reducing surprises and rejection rates during delivery. These proofs establish realistic expectations for halftone reproduction on specific substrates.
Create comprehensive test prints at different LPI settings to determine optimal resolution for each project. Test various combinations of squeegee pressures and angles to achieve the best dot reproduction consistency. Document these settings for repeatable production runs.
Substrate testing verifies dot gain compensation accuracy on actual printing materials. Different fabric types require specific compensation percentages that may vary from the standard 30% industry guideline. Cotton, polyester, and blended fabrics each exhibit unique absorption characteristics.
Quality improvement initiatives motivate consistent halftone production:
- Implement bonus plans for achieving production quality targets
- Establish clear halftone quality standards for all staff
- Develop standardized testing protocols for each substrate type
- Create feedback systems that connect testing results to production adjustments
Better art approval processes reduce scrap percentages and strengthen client relationships. Thorough testing and approval procedures prevent costly reprints while building client confidence in halftone capabilities.

Systematic testing and refinement create predictable halftone production workflows that minimize waste while maximizing print quality and client satisfaction.
How Can Thrive Screen Printing Help You with Halftone Projects?
Thrive Screen Printing provides comprehensive halftone printing solutions from their Phoenix, Arizona facility. Since 1997, this nationally recognized custom screen printer has operated from a climate-controlled 40,000 square foot headquarters, producing thousands of prints weekly for small businesses, local organizations, and large-scale global enterprise clients. CEO Robert Fisher brings extensive experience in screen printing and fulfillment to deliver professional halftone services.
The following sections detail Thrive’s specialized halftone capabilities and summarize the key technical insights covered throughout this guide.
What Halftone Printing Services Does Thrive Screen Printing Offer?
Thrive Screen Printing offers complete halftone screen printing services using specialized equipment and professional-grade materials. The company uses finer mesh screens and translucent inks specifically formulated for halftone reproduction, ensuring optimal dot formation and color accuracy.
Their halftone process includes:
- Image examination and textile compatibility assessment
- Color selection and separation planning
- Layer preparation for each screen color
- Film printing with precise registration
- Design adjustment for material-specific dot gain compensation
Thrive ensures all artwork meets the 300 DPI minimum resolution requirement and applies the industry-standard 30% dot gain compensation during preparation to prevent oversaturated images. This technical precision enables photorealistic effects through the optical illusion of continuous tones while maintaining brand identity consistency.
The entertainment industry’s demand for photorealistic printing drives many of Thrive’s halftone applications. Additional services include contract screen printing, wholesale screen printing, custom band merchandise, apparel fulfillment, DTG printing, plastisol printing, foil printing, and water-based ink screen printing.
Contact Thrive Screen Printing at (602) 607-1291 or info@thrivescreenprinting.com for halftone project consultations. Visit their facility at 3050 S 44th St, Phoenix, AZ 85040.
What Are the Key Takeaways About Halftones for Screen Printing We Covered?
Halftones create the optical illusion of continuous tones using varying dot sizes and spacing to simulate photographic imagery. The 22.5° angle is recommended for screen printing to avoid mesh interference, while the mesh count formula (divide by 4 or 5) determines ideal LPI settings.
Critical technical parameters include:
- 30% dot gain compensation as industry standard
- Screen tension maintained at 20-25 N/cm with ±1-2 N/cm variance between screens
- 300 DPI minimum resolution for quality artwork
- Translucent inks with proper viscosity for accurate reproduction
RIP software automates the halftone conversion process, making this cost-effective technique accessible for full-color reproduction with fewer inks. Halftone printing differentiates screen printing shops and positions them to win more complex, profitable orders as the industry seeks innovative printing methods.
Historical milestones include William Henry Fox Talbot’s credited development of the halftone concept and textile screen patents in 1852, the first halftone-printed photograph on December 2, 1873, and Georg Meisenbach’s commercially successful halftone screen patent in 1882. These innovations laid the foundation for modern halftone screen printing techniques used today.

Robert Fisher is the founder and CEO of Thrive Screen Printing and brings extensive experience in the screen printing and fulfillment industry.